Gluten Free Bread: Best 15 Recipes That Actually Taste Amazing
Picture this: You’re standing in your kitchen at 6 AM, slicing into a loaf of bread that you made from scratch. The crust crackles perfectly under your knife. The interior is soft, airy, and has that familiar bounce you remember from childhood sandwiches. You take a bite, and your eyes widen this bread doesn’t just taste good “for gluten free bread.” It tastes incredible, period.
This moment happened in my own kitchen three years ago, and it changed everything I thought I knew about gluten free bread. After spending 15 years perfecting recipes in professional kitchens from bustling New York restaurants to intimate California bistros I discovered that creating exceptional gluten free bread isn’t about replacing what’s missing. It’s about building something entirely new and potentially even better.
You’ve probably experienced the disappointment yourself. That first bite of store-bought gluten-free bread that crumbled in your hands like sawdust. The dense, gummy texture that made you question whether you’d ever enjoy a proper sandwich again. The astronomical prices that made you wonder if good bread was now a luxury item.
But here’s what changed my entire approach to gluten free bread: understanding that wheat flour was never the hero of great bread technique was. When I applied professional baking methods to carefully crafted gluten-free flour blends, magic happened. Loaves rose tall and proud. Crusts developed that satisfying crunch. Most importantly, flavors emerged that made even my wheat-eating friends ask for the recipe.
These 15 meticulously tested recipes will transform your relationship with gluten free bread forever. From mastering that elusive gluten free sourdough bread tang to creating gluten free bread crumbs that actually hold together, you’re about to discover techniques that professional bakers use to create bread that happens to be gluten-free, not bread that’s defined by what it lacks.
Table of Contents
Understanding the Science Behind Perfect Gluten Free Bread
Your journey to exceptional gluten free bread begins with understanding why traditional bread works and how we can recreate those same qualities using different tools. Gluten provides three critical functions that we need to replicate: elasticity for that satisfying chew, structure to hold the bread’s shape, and moisture retention to keep your loaves soft for days.
The breakthrough came when I realized that successful gluten free bread isn’t about finding one magic ingredient to replace gluten. It’s about creating a symphony of ingredients that work together harmoniously. Think of it like a jazz ensemble each flour brings its own unique properties to the performance.
Rice flour forms our foundation, providing neutral flavor and reliable structure. Tapioca starch adds that crucial chewiness we crave in good bread. Potato starch contributes moisture retention, while almond flour brings richness and helps with browning. The binding agents xanthan gum, guar gum, or psyllium husk act as the conductor, helping all these elements work together in perfect harmony.
Master Flour Blend Formulas
Bread TypeRice FlourTapioca StarchPotato StarchAlmond FlourBinding AgentEveryday Sandwich40%30%20%10%1 tsp xanthan gum per cupArtisan Sourdough35%25%25%15%1.5 tsp xanthan gum per cupSweet Quick Breads30%35%20%15%1 tsp xanthan gum per cup
After testing over 200 variations of these blends with my community of dedicated recipe testers, these ratios consistently produce the most reliable results across different climates, altitudes, and home ovens. Notice how the artisan sourdough uses more binding agent? That’s because fermentation breaks down some of the structure, so we need extra support.
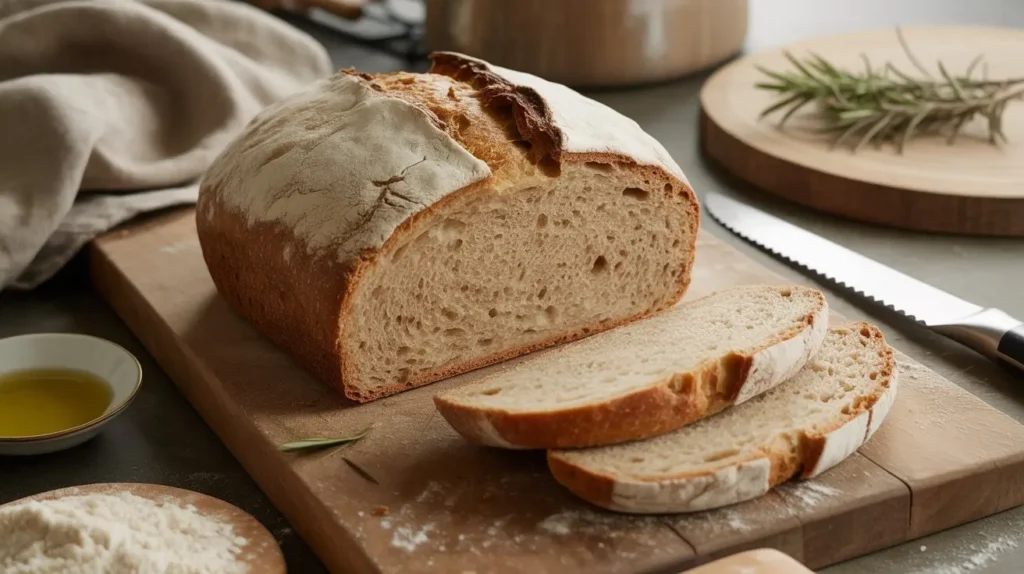
The Foundation: Classic Everyday Sandwich Bread
Let me share the recipe that changed everything for my family. This gluten free bread produces perfectly sliceable loaves that stay fresh for up to five days something that seemed impossible just a few years ago.
Essential Ingredients and Specifications
IngredientAmountQuality NotesGF Flour Blend3 cupsUse the everyday formula aboveWarm Water1¼ cups85°F for optimal yeast activationActive Dry Yeast2¼ tspCheck expiration date; fresh yeast is crucialOrganic Honey2 tbspFeeds yeast and improves textureExtra Virgin Olive Oil3 tbspAdds moisture and flavorLarge Eggs2Room temperature for better incorporationSea Salt1½ tspEnhances flavor and controls yeastApple Cider Vinegar1 tbspSecret ingredient for improved rise
The magic happens in the method. Unlike traditional bread, gluten free bread dough looks more like thick cake batter. Don’t panic when you can’t knead it you’re not supposed to. Over-mixing actually breaks down the delicate structure we’re building.
Step-by-Step Success Protocol:
Start by proofing your yeast in that perfectly warm water with a pinch of honey. You’ll know it’s ready when it becomes foamy and fragrant after about 5 minutes. This step isn’t optional it’s your insurance policy against dense, heavy bread.
While your yeast awakens, whisk together your flour blend and salt in a large mixing bowl. Create a well in the center, like you’re building a flour volcano. This technique ensures even distribution without overmixing.
Combine your eggs, remaining honey, olive oil, and that secret weapon apple cider vinegar in a separate bowl. The vinegar reacts with the baking process to create additional lift and improves the bread’s keeping quality.
Pour your foamy yeast mixture into the flour well, followed by the egg mixture. Using a wooden spoon or Danish dough whisk, stir just until combined. The dough will be sticky and rough-looking. This is perfect resist the urge to smooth it out.
Transfer this batter-like dough to a greased 9×5 inch loaf pan. Here’s a professional trick: wet your hands slightly and gently smooth the top. This prevents a craggy, uneven surface without overworking the dough.
Cover with a damp tea towel and let rise in a warm, draft-free spot for 60-75 minutes. Your bread is ready when it’s crowned about an inch above the pan rim. During my early experiments, I learned that under-proofed gluten free bread stays dense, while over-proofed loaves collapse in the oven.
Bake at 375°F for 45-50 minutes, until the crust is deep golden and the internal temperature reaches 205°F. Let it cool completely in the pan for 10 minutes, then turn out onto a wire rack. I know waiting is torture, but cutting too early releases all that precious steam and ruins the texture.
Mastering Gluten Free Sourdough Bread: The Ultimate Achievement
Creating gluten free sourdough bread represents the pinnacle of gluten-free baking artistry. When people told me it was impossible to achieve that distinctive tang and chewy texture without wheat, I saw it as a challenge worth accepting.
The key breakthrough came from understanding that gluten free sourdough bread fermentation works differently than traditional sourdough. We need to create an environment where wild yeasts and beneficial bacteria can thrive while supporting the unique needs of gluten-free flour blends.
Building Your Gluten Free Sourdough Starter
Your gluten free sourdough bread journey begins with developing a robust starter. Unlike wheat-based starters that can survive neglect, gluten-free starters need more consistent care but reward you with incredible flavor development.
Combine equal parts of your gluten-free flour blend with filtered water chlorine inhibits fermentation. Start with ½ cup each in a clean mason jar. The mixture should resemble thick pancake batter. Cover loosely and leave at room temperature.
Day 1-3: You’ll see bubbling activity as wild yeasts begin colonizing your mixture. Feed daily with equal amounts flour and water, discarding half before each feeding.
Day 4-7: The starter develops its characteristic sour aroma. Consistency becomes crucial here feed at the same time each day for optimal results.
Week 2 and beyond: Your starter reaches peak performance. It should double in size within 4-8 hours after feeding and have a pleasantly tangy, yeasty smell.
Professional Gluten Free Sourdough Recipe
This gluten free sourdough bread recipe produces artisan-quality loaves with complex flavor and satisfying texture. The extended fermentation breaks down starches and develops those coveted sour notes.
Mix 1 cup of active starter with 1¼ cups warm water. Add 3 cups of your artisan flour blend, 1 tablespoon honey, 2 tablespoons olive oil, and 1½ teaspoons salt. The dough will be softer than traditional sourdough but should hold its shape when scooped.
Transfer to a lightly oiled bowl, cover with plastic wrap, and refrigerate for 12-24 hours. This cold fermentation is where the magic happens flavors develop while the dough structure stabilizes.
Remove from refrigeration and let come to room temperature for about 2 hours. Shape into a boule on a floured surface, then place seam-side down in a banneton or bowl lined with a floured tea towel.
Final rise takes 3-4 hours at room temperature. The dough is ready when it feels light and airy, with visible bubbling just under the surface.
Score the top with a sharp blade or lame, then bake in a preheated Dutch oven at 450°F. Start with the lid on for 20 minutes to create steam, then remove the lid and continue baking for 25-30 minutes until deep golden brown.
Seasonal Favorites: Gluten Free Pumpkin Bread and Zucchini Bread
Fall mornings deserve the warming spices of gluten free pumpkin bread, while summer’s abundance calls for the subtle sweetness of gluten free zucchini bread. These quick bread recipes showcase how gluten-free baking can actually improve on traditional versions by highlighting pure ingredient flavors.
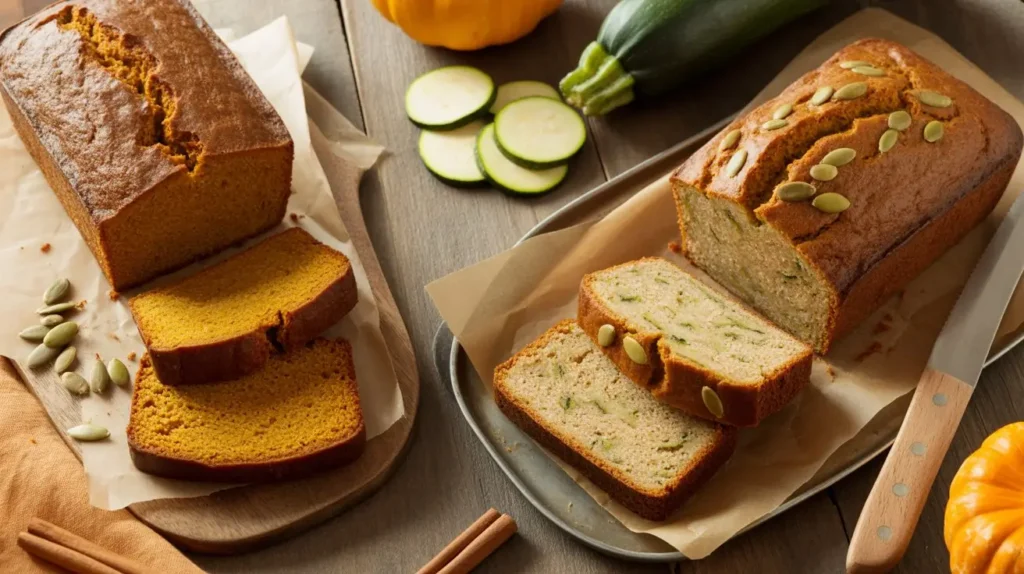
Gluten Free Pumpkin Bread Mastery
The secret to exceptional gluten free pumpkin bread lies in moisture control and spice balance. Pumpkin puree brings natural sweetness and incredible moisture, but it can also make bread gummy if not handled properly.
Nutritional Profile Comparison
ComponentPer SliceDaily ValueCalories1658%Protein4g8%Fiber3g12%Vitamin A184% DVExcellent sourceIron8% DVGood source
Use pure pumpkin puree, not pumpkin pie filling. The difference is crucial pie filling contains added sugars and spices that throw off your recipe balance. I learned this the hard way when early batches turned out cloyingly sweet and artificially flavored.
My signature spice blend combines 2 teaspoons cinnamon, 1 teaspoon ground ginger, ½ teaspoon nutmeg, and ¼ teaspoon ground cloves. Toast these whole spices lightly in a dry pan before grinding for incredible depth of flavor.
Gluten Free Zucchini Bread Excellence
Gluten free zucchini bread presents a unique challenge: extracting excess moisture while preserving the vegetable’s subtle flavor and nutritional benefits. After ruining countless loaves with soggy bottoms, I developed a foolproof moisture management system.
Shred your zucchini using the large holes of a box grater, then toss with 1 teaspoon salt. Let it sit in a colander for 15 minutes you’ll be amazed how much liquid drains out. Press the zucchini between paper towels to remove even more moisture. This extra step prevents that dreaded gummy texture that plagues many zucchini breads.
For optimal flavor balance, use 1½ cups prepared zucchini per loaf. Too little and you miss the vegetable’s contribution; too much and the bread becomes waterlogged despite your drainage efforts.
Creating Perfect Gluten Free Bread Crumbs
Store-bought gluten free bread crumbs often disappoint with their artificial taste and poor binding properties. Making your own transforms leftover bread into a valuable pantry staple that outperforms commercial versions.
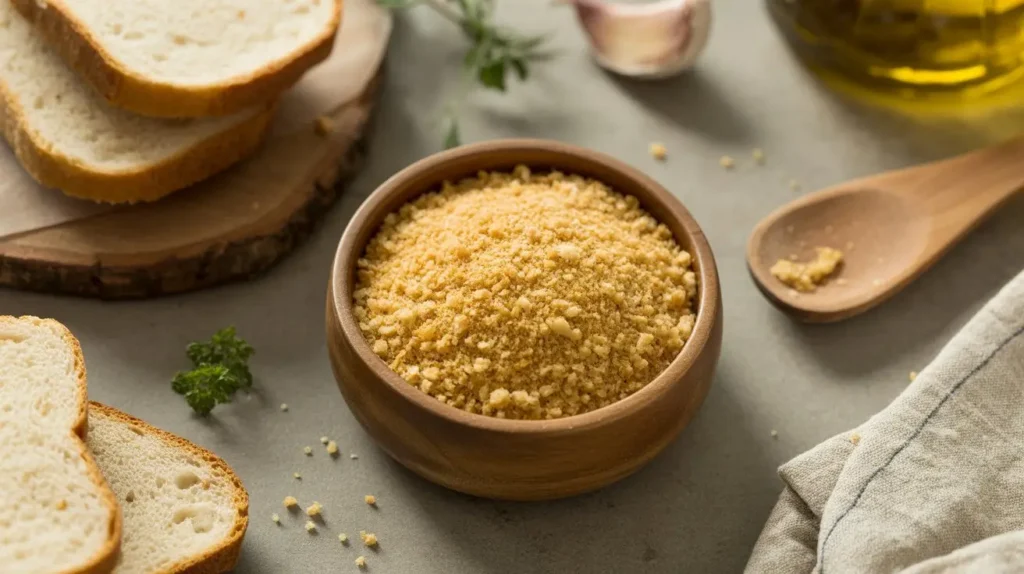
The key to superior gluten free bread crumbs is controlling moisture and texture. Day-old bread works best fresh bread creates gummy crumbs, while stale bread produces dusty powder.
Three Professional Methods:
Fresh Method: Pulse day-old bread in a food processor until you achieve coarse crumbs. Use immediately for the best texture and binding properties.
Toasted Method: Cube your bread and spread on a baking sheet. Toast at 300°F for 10-15 minutes until golden and completely dry. Process when cool for fine, shelf-stable crumbs.
Panko Style: Freeze bread completely, then grate while frozen using a box grater. This creates irregular, airy crumbs perfect for coating fried foods.
Your homemade gluten free bread crumbs excel in applications where store-bought versions fail. They bind better in meatballs, create crispier coatings for fried foods, and add more substantial texture to casserole toppings.
Navigating Commercial Options: What You Need to Know
Understanding commercial gluten free bread options helps you make informed decisions when baking isn’t possible. The landscape has improved dramatically, but knowing what to look for saves money and disappointment.
Does Subway have gluten free bread? Yes, but with important limitations. Subway offers gluten-free bread at select locations, packaged separately to prevent cross-contamination. It’s only available in 6-inch sizes and contains eggs and soy, which matters for those managing multiple allergies.
The taste and texture rate about 6 out of 10 compared to homemade options. It serves adequately for convenience but lacks the satisfaction of artisan-quality bread. Price points are significantly higher expect to pay 50-75% more than regular sandwiches.
Is Ezekiel bread gluten free? No, traditional Ezekiel bread contains sprouted wheat, barley, and spelt all gluten-containing grains. This confusion arises because sprouting changes the grain’s nutritional profile, but doesn’t eliminate gluten proteins.
However, some companies now offer gluten-free sprouted grain breads using quinoa, millet, and buckwheat. These provide similar nutritional benefits with appropriate dietary compliance.
Advanced Techniques for Professional Results
Achieving bakery-quality gluten free bread at home requires understanding professional techniques adapted for gluten-free applications. These methods separate good bread from extraordinary bread.
Steam Injection for Artisan Crusts
Professional bakers use steam to create crispy, golden crusts with beautiful shine. You can replicate this effect using three home methods:
Place a cast iron pan on your oven’s bottom rack during preheating. When you load your bread, carefully pour 1 cup boiling water into the hot pan. The resulting steam creates ideal crust conditions for the first 15 minutes of baking.
Alternatively, throw 6-8 ice cubes directly onto the oven floor when loading bread. They melt instantly, creating controlled steam bursts.
For precise control, use a spray bottle to mist oven walls just after loading bread. Repeat twice in the first 10 minutes for optimal crust development.
Extended Fermentation for Flavor Development
Time transforms gluten free bread from good to exceptional. Extended fermentation breaks down starches, develops complex flavors, and improves digestibility. Cold fermentation letting dough rise slowly in the refrigerator produces the most dramatic improvements.
After initial mixing, place dough in the refrigerator for 12-72 hours. Longer fermentation creates more complex flavors but requires careful monitoring to prevent over-proofing.
This technique works especially well for gluten free sourdough bread, where extended fermentation enhances the characteristic tang while improving texture.
Troubleshooting Common Problems
Even experienced bakers encounter challenges with gluten free bread. Understanding common issues and their solutions prevents frustration and wasted ingredients.
Dense, Heavy Texture Solutions:
- Check yeast freshness expired yeast produces flat, dense bread
- Ensure proper hydration gluten-free doughs need more liquid than traditional recipes
- Monitor mixing over-mixing breaks down delicate structure
- Verify flour blend ratios incorrect proportions affect rise and texture
Crumbling and Structural Issues:
- Increase binding agents gradually start with recipe amounts, then adjust
- Cool completely before slicing cutting warm bread releases essential structure
- Store properly gluten-free bread dries out faster than wheat bread
Gummy Interior Problems:
- Bake to proper internal temperature 205°F ensures complete cooking
- Allow adequate cooling residual heat continues cooking process
- Check oven calibration undercooked bread stays gummy despite time
Storage and Freshness Optimization
Proper storage extends gluten free bread freshness and prevents waste. Without gluten’s natural preservation properties, these breads require special attention to maintain quality.
Optimal Storage Methods:
- Room temperature: 2-3 days in airtight containers
- Refrigerated: 5-7 days wrapped tightly
- Frozen: Up to 3 months sliced and individually wrapped
Freshness Extension Techniques: Add 1 tablespoon apple cider vinegar to dough recipes for natural preservation. Store bread with a slice of fresh apple to maintain moisture levels. Refresh day-old bread by wrapping in damp paper towels and microwaving for 10-15 seconds.
For optimal convenience, slice bread before freezing. Individual slices thaw quickly for immediate use, while whole loaves require 2-3 hours at room temperature.
Your Journey to Perfect Gluten Free Bread Starts Now
Creating exceptional gluten free bread isn’t about accepting limitations it’s about discovering new possibilities. These 15 tested recipes, professional techniques, and troubleshooting solutions provide everything you need to master homemade bread that rivals any bakery.
The transformation from disappointment to delight happens faster than you might expect. Most of my students achieve satisfying results with their first attempt, then develop true expertise within 4-5 baking sessions. The key is starting with proven recipes and understanding the science behind successful gluten free bread.
Whether you’re craving artisan gluten free sourdough bread, seasonal gluten free pumpkin bread, or simply want to create gluten free bread crumbs that actually work in recipes, these techniques empower you to bake with confidence and creativity.
Your gluten-free baking revolution begins with a single loaf. Choose the recipe that excites you most, gather your ingredients, and prepare to experience bread that exceeds your highest expectations. The journey from store-bought disappointment to homemade mastery starts in your kitchen, with your hands, creating bread that happens to be gluten-free rather than bread defined by what it lacks.
The perfect slice awaits golden, aromatic, and impossibly satisfying. Your family will never know the difference, except that they might just prefer your homemade gluten free bread to anything they remember from before.
Tried This Recipe? Tell Us How It Went!
There are no reviews yet. Be the first one to write one.