Rice Cooker Recipes: How to Make Perfect Dishes Every Time
Picture this: It’s 6 PM on a Tuesday, you’re exhausted from a long day, and the last thing you want is to spend the next hour juggling multiple pots and pans. Your family is hungry, the kitchen feels overwhelming, and takeout is becoming too frequent an expense. What if I told you that sitting quietly on your countertop right now is a magical appliance that can transform simple ingredients into restaurant-quality meals with virtually no effort?
Your humble rice cooker isn’t just for rice anymore. This unassuming kitchen hero has been quietly revolutionizing home cooking for families worldwide, and it’s time you discovered its true potential. Whether you’re a busy parent trying to balance work and family life, a college student living on a tight budget, or someone who simply wants to eat well without the stress of complicated cooking, rice cooker recipes are about to become your secret weapon.
The beauty of mastering rice cooker recipes lies not just in their simplicity, but in their reliability. Unlike stovetop cooking where timing is everything and disasters lurk around every corner, your rice cooker delivers consistent, delicious results every single time. From perfectly fluffy grains to complete one-pot meals that feed the whole family, this comprehensive guide will unlock techniques that professional chefs have been using for years.
In the next few minutes, you’ll discover how to transform basic ingredients into five distinct categories of amazing dishes. We’ll explore everything from recreating your favorite takeout meals at home to preparing nutritious breakfast options that fuel your entire day. You’ll learn the secrets behind perfectly cooked grains, discover gluten-free alternatives that actually taste good, and master the art of one-pot family meals that require minimal cleanup.
Ready to transform your kitchen routine and reclaim your evenings? Let’s dive into the world of effortless, delicious meals that practically cook themselves.
Table of Contents
Chicken Over Rice: How to Make Restaurant-Quality Meals
The aroma of perfectly seasoned chicken over rice wafting through your kitchen can transport you straight to your favorite Middle Eastern restaurant. But here’s the secret that most people don’t know: achieving that same authentic taste and texture at home is not only possible, it’s actually easier than you think when you harness the power of your rice cooker.

Chicken over rice has become one of the most requested comfort foods in America, and for good reason. This dish combines tender, flavorful protein with perfectly cooked grains and aromatic vegetables in a way that satisfies on every level. The key lies in understanding how the rice cooker’s gentle steam cooking method can layer flavors in ways that traditional cooking methods simply can’t match.
The Foundation: Selecting Your Ingredients
The magic of exceptional chicken over rice begins with ingredient selection. Your chicken choice matters more than you might think. While breast meat might seem like the obvious choice, experienced cooks know that chicken thighs deliver superior flavor and texture. The higher fat content in thighs means they stay moist during the cooking process, while the additional collagen breaks down into gelatin, creating a naturally rich sauce.
For the rice foundation, long-grain basmati rice produces the best results. Its lower starch content means each grain remains separate and fluffy, while its natural nutty flavor complements the chicken beautifully. Before cooking, always rinse your rice until the water runs clear. This removes excess starch and prevents the final dish from becoming gummy.
The vegetable component shouldn’t be an afterthought. Onions form the aromatic base, while carrots add natural sweetness and bell peppers contribute color and crunch. The secret is cutting all vegetables to similar sizes so they cook evenly in the rice cooker’s consistent heat environment.
Mastering the Cooking Process
Here’s where most home cooks go wrong: they treat the rice cooker like a simple steamer when it’s actually a precision cooking instrument. The layering technique is crucial for restaurant-quality results. Start by seasoning your chicken pieces with a blend of cumin, paprika, garlic powder, and salt. Let this sit for at least 15 minutes to allow the spices to penetrate the meat.
Place the seasoned chicken at the bottom of your rice cooker. This positioning is strategic – as the chicken cooks, its juices will flavor everything above it. Add your diced onions directly on top of the chicken, followed by other vegetables. The rice goes on next, creating a protective layer that prevents burning while allowing the grain to absorb all those wonderful flavors.
The liquid component requires careful consideration. A combination of chicken broth and water (2:1 ratio) creates the perfect cooking environment. Add enough liquid to cover the rice by about half an inch. Too little liquid results in undercooked grains, while too much creates a mushy mess.
The Sauce Game-Changer
What truly separates restaurant-quality chicken over rice from homemade attempts is the sauce. The famous white sauce that tops most versions is surprisingly simple to make. Combine Greek yogurt, mayonnaise, lemon juice, garlic powder, and a pinch of sugar. The yogurt provides tang and creaminess, while the mayonnaise adds richness. The lemon juice brightens the entire dish, and the sugar balances the acidity.
For the hot sauce component, blend together hot peppers, vinegar, garlic, and a touch of tomato paste. The vinegar provides the signature tang, while the tomato paste adds body and deeper flavor. Adjust the heat level by varying the type and amount of peppers you use.
Ingredient Comparison for Perfect Results
| Ingredient | Best Choice | Alternative | Impact on Final Dish |
|---|---|---|---|
| Chicken | Boneless thighs | Chicken breast |
Thighs: More flavor, stays moist |
| Rice | Basmati | Jasmine rice |
Basmati: Better texture, distinct grains |
| Cooking Liquid | Chicken broth + water | Water only |
Broth: Richer flavor, better color |
| Onions | Yellow onions | White onions |
Yellow: Sweeter, more complex flavor |
The cooking time typically ranges from 25-30 minutes, but here’s the crucial part: resist the urge to lift the lid during cooking. Each time you open the rice cooker, you release steam and disrupt the cooking process. The rice cooker will signal when it’s complete, and that’s your cue to let it rest for an additional 5 minutes before opening.
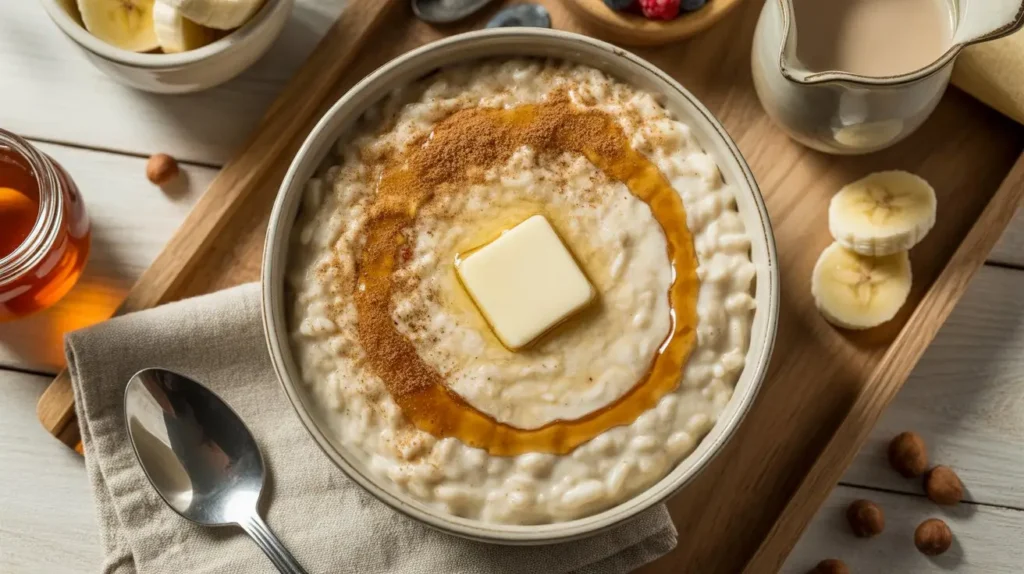
Cream of Rice: How to Make Perfect Breakfast Every Time
Morning nutrition sets the tone for your entire day, yet most people settle for sugary cereals or skip breakfast entirely. Cream of rice offers a completely different approach – a warm, comforting breakfast that provides sustained energy while being gentle on your digestive system. This isn’t the bland, hospital-like porridge you might remember from childhood. When prepared correctly, cream of rice becomes a creamy, customizable canvas for flavors that will make you look forward to morning.
The nutritional profile of cream of rice makes it an ideal breakfast choice for various dietary needs. It’s naturally gluten-free, easily digestible, and provides complex carbohydrates that release energy slowly throughout the morning. Unlike quick oats or processed cereals, cream of rice doesn’t cause blood sugar spikes, making it perfect for those managing diabetes or anyone seeking steady energy levels.
Building the Perfect Base
The foundation of exceptional cream of rice lies in understanding the grain-to-liquid ratio and cooking technique. Start with a high-quality rice cereal – brands like Cream of Rice or Bob’s Red Mill provide the best texture. The key is using a 1:4 ratio of cereal to liquid, but the type of liquid you choose dramatically impacts the final result.
Whole milk creates the creamiest texture and adds protein, while almond milk provides a lighter, slightly nutty flavor. Coconut milk offers richness and subtle tropical notes, perfect for sweet preparations. For the ultimate indulgence, try a combination of milk and heavy cream, which creates an almost custard-like consistency.
The cooking process requires attention to detail. Add the cereal to cold liquid – never hot – and whisk continuously as you bring the mixture to a gentle simmer. This prevents clumping and ensures smooth, creamy results. The rice cooker’s gentle heat makes this process foolproof, maintaining the perfect temperature without scorching.
Flavor Transformation Techniques
Here’s where cream of rice transitions from simple to spectacular. The neutral flavor profile makes it incredibly versatile, able to adapt to both sweet and savory preparations. For sweet versions, vanilla extract and a touch of honey create a classic combination. Cinnamon and nutmeg add warmth, while fresh berries provide natural sweetness and antioxidants.
Savory preparations open up entirely different possibilities. A pinch of salt and white pepper creates a neutral base, while herbs like chives or dill add freshness. Parmesan cheese stirred in at the end creates a risotto-like texture, perfect for topping with a poached egg.
The texture can be customized based on your preference. For a thicker consistency, use less liquid or cook longer. For a thinner, more soup-like texture, gradually add warm milk until you reach your desired consistency. The beauty of the rice cooker is that it maintains temperature perfectly, allowing you to adjust without fear of burning.
Nutritional Enhancement Strategies
Transform your cream of rice into a nutritional powerhouse by incorporating strategic additions. Protein powder blends seamlessly into the hot cereal, creating a complete meal that keeps you satisfied for hours. Chia seeds add omega-3 fatty acids and fiber while creating interesting texture contrast.
Ground flaxseed provides additional fiber and healthy fats, while chopped nuts add crunch and protein. Fresh fruit not only enhances flavor but also provides essential vitamins and minerals. The key is adding these ingredients at the right time – proteins and supplements during cooking, while nuts and fresh fruits work best as toppings.
Cream of Rice Preparation Guide
| Preparation Style | Cooking Time | Liquid Ratio | Key Ingredients | Nutritional Benefits |
|---|---|---|---|---|
| Classic Sweet | 12-15 minutes | 1:4 (cereal:milk) | Vanilla, honey, cinnamon | Comfort food, moderate protein |
| Protein-Packed | 15-18 minutes | 1:4.5 (cereal:liquid) | Protein powder, berries | High protein, sustained energy |
| Savory Herb | 12-15 minutes | 1:4 (cereal:broth) | Herbs, cheese, pepper | Unique flavor, lower sugar |
Instant Pot Brown Rice: How to Save Time and Win
Brown rice has long been the nutritional champion of the grain world, packed with fiber, minerals, and complex carbohydrates that white rice simply can’t match. However, its reputation for being difficult to cook has kept many people from incorporating it into their regular meal rotation. The traditional stovetop method requires careful timing, precise water ratios, and constant monitoring to avoid mushy or undercooked results.
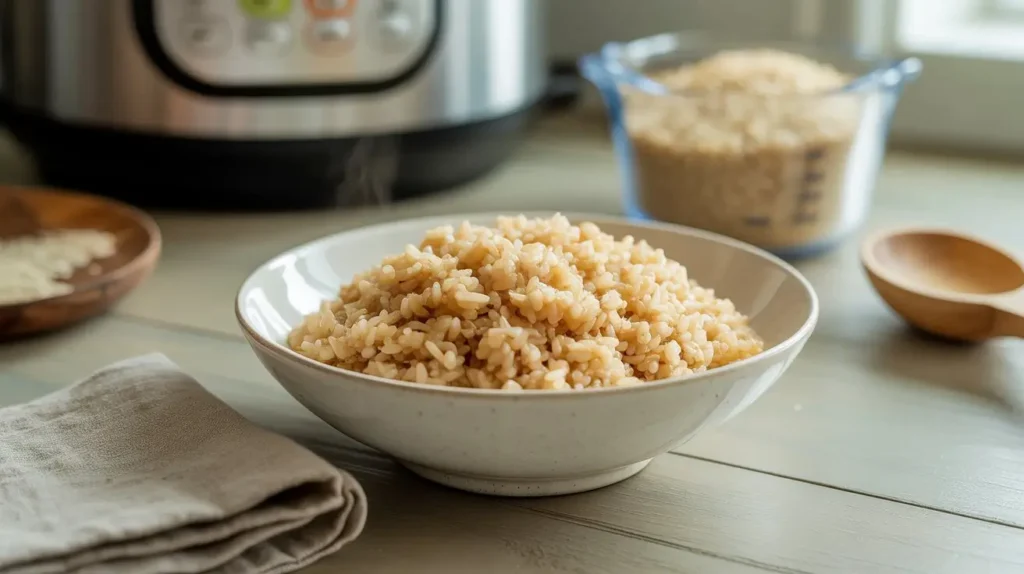
Instant Pot brown rice changes everything. This pressure cooking method eliminates the guesswork while dramatically reducing cooking time. What once took 45-60 minutes on the stovetop now takes just 22 minutes of pressure cooking, plus natural release time. More importantly, the results are consistently perfect – each grain separate, fluffy, and perfectly cooked.
Understanding Brown Rice Nutrition
Before diving into technique, it’s worth understanding why Instant Pot brown rice deserves a place in your meal planning. Unlike white rice, brown rice retains its bran layer, which contains the majority of nutrients. This includes B vitamins, iron, magnesium, and fiber. The fiber content helps regulate blood sugar levels and promotes digestive health, while the complex carbohydrates provide sustained energy without the crashes associated with refined grains.
The mineral content is particularly impressive. Brown rice provides significant amounts of manganese, which supports bone health and metabolism. The magnesium content helps regulate blood pressure and supports muscle function. These nutritional benefits make brown rice an excellent foundation for healthy meal planning.
Perfecting the Pressure Cooking Method
The key to perfect Instant Pot brown rice lies in understanding the relationship between rice type, liquid ratio, and cooking time. Long-grain brown rice requires a 1:1.25 ratio of rice to liquid, while short-grain varieties need slightly more liquid at 1:1.5. Using broth instead of water adds flavor depth without any additional effort.
The cooking process is remarkably simple but requires attention to detail. Rinse the rice until the water runs clear, then add it to the Instant Pot with the appropriate amount of liquid. A pinch of salt enhances flavor, while a teaspoon of oil or butter prevents foaming. Set the pressure to high and cook for 22 minutes, followed by a 15-minute natural release.
The natural release period is crucial for perfect texture. Quick release creates temperature shock that can result in mushy rice. During the natural release, the rice continues cooking gently in the residual heat, ensuring each grain reaches the perfect texture.
Meal Prep Mastery
Instant Pot brown rice excels in meal prep scenarios. A single batch can provide the foundation for multiple meals throughout the week. The key is proper storage and reheating techniques. Allow the rice to cool completely before refrigerating in airtight containers. Properly stored brown rice maintains quality for up to 5 days in the refrigerator.
For longer storage, brown rice freezes beautifully. Portion it into meal-sized containers or freezer bags, removing as much air as possible. Frozen brown rice keeps for up to 3 months and can be reheated directly from frozen. The texture remains virtually identical to freshly cooked rice.
Reheating requires a gentle approach. Add a tablespoon of water per cup of rice, cover, and microwave in 30-second intervals until heated through. Alternatively, reheat in a covered saucepan over low heat, stirring occasionally and adding water as needed.
Advanced Flavor Development
While perfectly cooked Instant Pot brown rice is delicious on its own, simple modifications can create exciting variations. Toast the rice in the Instant Pot using the sauté function before adding liquid. This creates a nutty flavor and slightly firmer texture. Coconut milk can replace some of the water for tropical dishes, while broth adds savory depth.
Aromatics like bay leaves, whole spices, or herb sprigs can be added during cooking and removed before serving. These infuse subtle flavors throughout the rice without overwhelming the natural grain taste. The key is using whole spices rather than ground, which can create muddy textures and bitter flavors.
Are Rice Krispies Gluten Free? Best Answer You Need
The question of whether Rice Krispies are gluten free affects millions of people dealing with celiac disease, gluten sensitivity, or those simply choosing a gluten-free lifestyle. The answer is more complicated than you might expect, and understanding the nuances can mean the difference between a safe meal and a potential health issue.
Rice itself is naturally gluten-free, which leads many people to assume that Rice Krispies cereal would automatically be safe for those avoiding gluten. However, the manufacturing process and added ingredients complicate this assumption significantly. The reality is that traditional Kellogg’s Rice Krispies contain malt flavoring, which is derived from barley – a gluten-containing grain.
Decoding the Ingredient List
The primary concern with Rice Krispies gluten free status lies in the malt flavoring used in the original formula. Malt flavoring is created from barley malt, which contains gluten proteins. Even small amounts of gluten can trigger reactions in people with celiac disease, making traditional Rice Krispies unsuitable for strict gluten-free diets.
Beyond malt flavoring, cross-contamination during manufacturing presents another challenge. Facilities that process wheat, barley, and rye alongside rice products can introduce gluten through shared equipment, air circulation, or inadequate cleaning procedures. This cross-contamination can occur even when the ingredients themselves are gluten-free.
Vitamin fortification adds another layer of complexity. Some vitamin and mineral supplements used in cereal fortification are manufactured using gluten-containing processing aids. While these may not appear on the ingredient label, they can still introduce gluten into the final product.
Understanding Gluten-Free Certification
True Rice Krispies gluten free alternatives require third-party certification to ensure safety. The Gluten-Free Certification Organization (GFCO) requires products to contain less than 10 parts per million (ppm) of gluten, which is stricter than the FDA’s 20 ppm standard. This certification involves regular testing and facility inspections to maintain compliance.
When shopping for gluten-free Rice Krispies alternatives, look for the certified gluten-free symbol on packaging. This symbol indicates that the product has undergone rigorous testing and meets strict gluten-free standards. Several brands now offer certified gluten-free puffed rice cereals that provide similar texture and taste to traditional Rice Krispies.
Safe Alternatives and Brands
Several manufacturers now produce Rice Krispies gluten free alternatives that deliver the same satisfying crunch and neutral flavor. Nature’s Path Crispy Rice offers an organic, certified gluten-free option that works perfectly in recipes calling for Rice Krispies. The texture is virtually identical, and the flavor is clean and neutral.
Arrowhead Mills Puffed Rice provides another excellent alternative. This brand focuses on minimal processing and uses only certified gluten-free ingredients. The puffed rice has a slightly different texture – a bit more delicate than traditional Rice Krispies – but performs well in recipes and offers superior nutritional value.
For those who prefer to make their own, puffed rice can be created at home using a popcorn maker or oven method. This approach ensures complete control over ingredients and eliminates any concerns about cross-contamination or hidden gluten sources.
Gluten-Free Rice Cereal Comparison
| Brand | Certification | Key Features | Best Uses |
|---|---|---|---|
| Nature’s Path Crispy Rice | GFCO Certified | Organic, neutral flavor | Cereal, baking, treats |
| Arrowhead Mills Puffed Rice | GFCO Certified | Minimal processing, clean taste | Cereal, snacking |
| Homemade Puffed Rice | Self-controlled | Complete ingredient control | Custom recipes, treats |
Recipe Adaptations
Traditional Rice Krispies treats can be easily adapted using Rice Krispies gluten free alternatives. The key is understanding that different brands may absorb marshmallow mixture differently. Some gluten-free puffed rice cereals are more delicate and require gentler mixing to prevent crushing.
The marshmallow component also requires attention. Many commercial marshmallows contain gluten-containing ingredients or are processed in facilities that handle wheat. Brands like Dandies or Trader Joe’s offer gluten-free marshmallows that work perfectly in treat recipes.
For savory applications, gluten-free puffed rice makes excellent breading for chicken or fish. The neutral flavor allows seasonings to shine while providing satisfying crunch. Crush the cereal slightly for better adherence, and season generously for maximum flavor impact.
Rice Cooker Meals: Best Easy Recipes for Busy Families
The modern family faces unprecedented time pressures, with packed schedules leaving little room for elaborate meal preparation. Rice cooker meals offer a practical solution that doesn’t compromise on nutrition or flavor. These one-pot wonders can feed a family of four to six people with minimal preparation time and virtually no cleanup.

The beauty of rice cooker meals lies in their versatility and reliability. Unlike stovetop cooking, which requires constant attention and timing coordination, rice cooker meals allow you to add ingredients, press a button, and walk away. The controlled heat environment ensures that proteins cook thoroughly, vegetables retain their nutrients, and grains achieve perfect texture every time.
The Science Behind One-Pot Success
Understanding how rice cooker meals work scientifically helps you create better dishes. The rice cooker’s sealed environment creates a gentle steam-cooking atmosphere that circulates moisture evenly throughout the pot. This method prevents hot spots that can cause burning while ensuring that all ingredients cook at the same rate.
The layering technique is crucial for success. Proteins go on the bottom where they’ll receive the most direct heat, while vegetables are placed strategically based on their cooking times. Root vegetables like carrots and potatoes need more time and should be placed lower in the pot, while quick-cooking vegetables like bell peppers and zucchini should be layered higher.
The starch component – whether rice, quinoa, or another grain – acts as both an ingredient and a cooking medium. As it absorbs liquid, it releases starches that help bind the dish together while creating a creamy, satisfying texture. This natural thickening eliminates the need for artificial additives or complex sauce-making techniques.
Protein-Packed Family Favorites
Rice cooker meals excel at transforming affordable proteins into satisfying family dinners. Chicken thighs work particularly well because their higher fat content keeps them moist during the cooking process. Season them with herbs and spices, then layer with vegetables and rice for a complete meal.
Lean beef cuts like sirloin or round can be used successfully when cut into smaller pieces. The key is browning the meat first using the rice cooker’s sauté function if available, or in a separate pan. This creates flavor depth and ensures proper texture in the final dish.
Ground meats offer incredible versatility and cook quickly in the rice cooker environment. Ground turkey, beef, or pork can be seasoned and formed into meatballs, or simply crumbled and mixed with vegetables and grains. The natural juices from the meat infuse the entire dish with rich flavor.
Vegetarian and Plant-Based Options
Rice cooker meals adapt beautifully to vegetarian and vegan diets. Legumes like lentils and chickpeas provide protein and fiber while absorbing flavors from surrounding ingredients. The key is using the right liquid ratios and cooking times to ensure proper texture.
Quinoa makes an excellent base for plant-based rice cooker meals. This complete protein contains all essential amino acids and cooks perfectly in the rice cooker’s gentle heat. Combine it with vegetables, herbs, and a flavorful broth for satisfying meals that please omnivores and vegetarians alike.
Mushrooms add umami depth to vegetarian rice cooker meals. Varieties like shiitake, portobello, and cremini provide different flavor profiles and textures. The rice cooker’s moist environment allows mushrooms to release their natural juices, creating rich, savory broths that enhance the entire dish.
Meal Planning and Batch Cooking
Rice cooker meals excel in meal planning scenarios. Most recipes can be doubled or tripled to provide leftovers for the week. The key is having a rice cooker large enough to accommodate bigger batches – a 6-cup or larger model works best for families.
Preparation can be streamlined by chopping vegetables and measuring ingredients ahead of time. Store prepped ingredients in containers or freezer bags, then simply dump everything into the rice cooker when ready to cook. This approach makes weeknight dinners effortless even after long, tiring days.
Leftover rice cooker meals reheat beautifully and often taste even better the next day as flavors continue to meld. Store in refrigerator for up to 4 days, or freeze portions for up to 3 months. Add a splash of broth or water when reheating to restore moisture.
Family-Friendly Rice Cooker Meal Ideas
| Meal Type | Prep Time | Cook Time | Servings | Key Ingredients |
|---|---|---|---|---|
| Chicken & Vegetable Rice | 15 min | 30 min | 6 | Chicken thighs, mixed vegetables, jasmine rice |
| Beef & Mushroom Quinoa | 20 min | 35 min | 8 | Ground beef, mushrooms, quinoa, broth |
| Lentil & Sweet Potato Curry | 10 min | 25 min | 6 | Red lentils, sweet potatoes, coconut milk |
Frequently Asked Questions About Rice Cooker Recipes
How long do rice cooker recipes typically take to cook?
Most rice cooker recipes require 20-45 minutes of cooking time, depending on the ingredients and complexity. Simple rice dishes finish in 20-25 minutes, while complete meals with proteins and vegetables may take 30-45 minutes. The advantage is that this time is completely hands-off, allowing you to focus on other tasks while your meal cooks perfectly.
Can you cook meat and rice together safely in a rice cooker?
Yes, you can safely cook meat and rice together in a rice cooker when using proper techniques. Layer seasoned meat at the bottom of the pot, add vegetables, then rice and liquid. The rice cooker’s consistent heat ensures that meat reaches safe internal temperatures – 165°F for poultry and 160°F for ground meats. Use a meat thermometer to verify doneness if you’re unsure.
What’s the best rice to water ratio for rice cooker recipes?
The standard ratio is 1:1.5 (rice to water) for most white rice varieties, and 1:2 for brown rice. However, when adding other ingredients like vegetables or proteins, you may need to adjust the liquid content. Start with basic ratios and add liquid gradually if needed. Remember that vegetables release moisture during cooking, which can affect the final texture.
Do rice cooker recipes work with all types of rice cookers?
Most rice cooker recipes work with any basic rice cooker, though cooking times may vary slightly between models. Advanced rice cookers with multiple settings offer more precise control, but even simple on/off models produce excellent results. The key is understanding your specific cooker’s performance and adjusting liquid ratios and timing accordingly.
How do you prevent rice cooker meals from burning or sticking?
Prevent burning by using adequate liquid, avoiding high-sugar ingredients on the bottom, and not lifting the lid during cooking. Layer ingredients properly with proteins and vegetables on bottom, rice in middle, and liquid on top. If your cooker tends to run hot, add slightly more liquid or reduce cooking time. A light coating of oil or cooking spray on the bottom can also help prevent sticking.
Can you make desserts in a rice cooker?
Absolutely! Rice cooker recipes extend beyond savory dishes to include delicious desserts. Rice pudding, bread pudding, and even simple cakes can be made in your rice cooker. The gentle, even heat is perfect for custard-like desserts that might curdle or burn on the stovetop. Sweet rice dishes with milk, vanilla, and fruit make excellent comfort food desserts.
What size rice cooker is best for family meals?
For rice cooker meals that feed a family of four to six people, choose a 6-cup or larger model. This size provides enough capacity for complete meals with proteins, vegetables, and grains. Smaller 3-cup models work well for couples or side dishes, while 10-cup models are ideal for large families or batch cooking. Consider your typical serving sizes when selecting capacity.
How do you clean a rice cooker after cooking complete meals?
Cleaning after rice cooker meals is surprisingly easy. Allow the pot to cool completely, then soak in warm, soapy water for 10-15 minutes. Most stuck-on food will release easily with gentle scrubbing. For stubborn residue, make a paste with baking soda and water, let it sit for 30 minutes, then scrub gently. Never use abrasive cleaners that might damage the non-stick coating.
Conclusion: Master Your Rice Cooker Recipe Journey
Your rice cooker journey doesn’t end here – it’s just beginning. Throughout this comprehensive guide to rice cooker recipes, we’ve explored how this humble appliance can transform your entire approach to home cooking. From restaurant-quality chicken over rice that rivals your favorite takeout to nutritious breakfast bowls that fuel your day, you now have the knowledge to create satisfying meals with minimal effort.
The techniques we’ve covered – proper layering, ingredient timing, and liquid ratios – form the foundation for countless variations and creative adaptations. As you become more comfortable with your rice cooker’s capabilities, you’ll discover endless possibilities for customization. Each meal becomes an opportunity to experiment with new flavors while maintaining the convenience and reliability that makes rice cooker recipes so appealing.
Remember that mastering rice cooker recipes is about more than just following instructions – it’s about understanding how ingredients work together in this unique cooking environment. The gentle steam heat, consistent temperature, and sealed cooking chamber create conditions that are nearly impossible to replicate with traditional cooking methods. This understanding will help you troubleshoot issues, adapt recipes to your family’s preferences, and create your own signature dishes.
The time-saving benefits of rice cooker recipes extend beyond the kitchen. When you can create complete, nutritious meals with minimal preparation and cleanup, you reclaim precious time for the things that matter most. Whether that’s spending more time with family, pursuing hobbies, or simply enjoying a few moments of peace in your day, these recipes provide the foundation for a more balanced lifestyle.
Start with one recipe that speaks to your family’s tastes and dietary needs. Master the technique, then gradually expand your repertoire. Your rice cooker is waiting to become your most trusted kitchen companion – one that delivers consistent results, saves time, and creates meals that bring your family together around the table.
What’s your favorite discovery from this guide? Share your success stories, recipe variations, and creative adaptations in the comments below. Your experiences might inspire other families to embrace the convenience and deliciousness of rice cooker recipes!
Tried This Recipe? Tell Us How It Went!
There are no reviews yet. Be the first one to write one.